
Are you looking to expand the capabilities of your drill press? With a few simple steps, you can add a milling function to your drill press, giving you the ability to perform precise milling operations on metal. In this article, we will guide you through the process, providing you with the knowledge to transform your drill press into a versatile milling tool.
Step 1: Preparing the Nuts
To begin, you will need two nuts that will serve as the key components for the milling function. The first nut will be used to set the depth in drill press mode. Start by drilling two holes, using a 1/8″ drill bit, and tap them for M4 thread. After tapping is complete, ensure the screw in the nut is clean and free from any burrs that may damage the thread. An M10 tap or a spare M10 screw can be handy for this task, but remember to use a different screw to avoid potential damage to the freshly made set screw.
Step 2: Creating the Depth-Holding Screw
The depth-holding screw is crucial for achieving precise milling operations. Start by marking the rim of the nut with ten evenly spaced marks. This will allow you to set the depth accurately. To make the outer perimeter of the nut circular, thread it onto an M10 rod and secure it with another nut. Then, spin it against a sander to achieve a circular shape quickly. Finish by hand-sanding the surface with a 400 grit sandpaper for a smooth finish.
Step 3: Marking the Grooves
Next, mark ten lines on a piece of paper at 36-degree intervals. Center the nut on the paper and mark the line locations on the nut. Use a triangular file to cut a notch at each marked location. Alternatively, a rotary tool can be used, but it may be challenging to keep the grooves straight. To ensure precision, you can start each groove with a Dremel on one end, preventing the file from wandering during groove cutting. Consider marking each groove with a felt tip pen or paint to make them more visible.
Step 4: Adding Lock Screw Holes
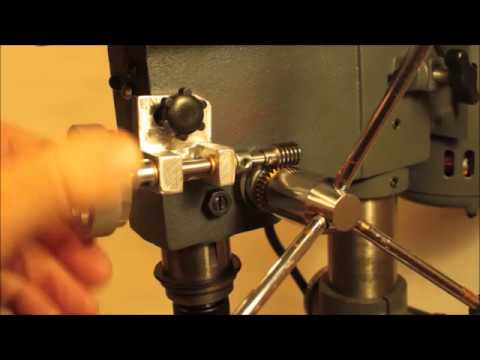
Drill two holes on opposite sides of the nut and tap them for M4 thread, similar to the previous nut. In this case, you may choose to position these lock screw holes between the grooves. These holes will accommodate two M4 set screws commonly used in 3D printers to secure various parts to motor axles. If you haven’t already done so, remove the old set screw. You can remove the entire assembly, or simply remove the nuts and pull out the screw. Once removed, replace it with the new screw and thread the grooved nut in place. Proceed by threading the lower M6 screw through the collar and securing it with a nut. Fit the new top nut and attach the depth indicator onto the top M6 screw. Ensure a snug fit for accurate depth indication.

Now, with your drill press equipped with a milling function, you can enjoy the versatility it offers. From drilling to milling, your drill press is now capable of handling various metalworking tasks with precision and ease.
FAQs
Q: Can I add a milling function to any drill press?
A: The ability to add a milling function will depend on the design of your specific drill press. It is best to consult the manufacturer’s instructions or research if your drill press is suitable for this modification.
Q: Are there any safety considerations when using a drill press with a milling function?
A: Yes, it is essential to follow proper safety precautions when using a drill press for milling. Wear appropriate protective gear, secure the workpiece firmly, and operate the drill press at the recommended speed for milling operations.
Q: What kind of milling operations can I perform with a drill press?
A: With the milling function added to your drill press, you can perform operations such as slot cutting, profile milling, and drilling precise holes on metal surfaces.
Conclusion
Transforming your drill press into a multifunctional tool opens up a world of possibilities for metalworking projects. By adding a milling function, you expand the capabilities of your drill press, enabling you to perform precise milling operations on metal. With the steps outlined in this article, you can enhance your drill press and achieve professional results in your metalworking endeavors. Discover the potential of your drill press and make the most of your projects with the milling function upgrade.
To learn more about the Best Drill Press For Metal, visit this link.

As the CEO of BestDrillPressforMetal.com, I take immense pride in our unwavering commitment to transformation and excellence in metalworking. I am driven and passionate about creating the best possible user experience for our customers and helping them achieve their goals with precision and innovation. With my guidance, we have established ourselves as a leader and trusted partner within the industry by leveraging cutting-edge technologies to push boundaries with incredible products that exceed expectations. We understand that metalworking is more than just a process; it is an art form made real through passion, dedication, and diligence—all of which embody our core values at BestDrillPressforMetal.com.